

Before you build anything, ask for a plan
Here is something that will save you a great deal of time on any complex project, not just this one.
Before you open MindStudio. Before you touch a spreadsheet. Before you ask any AI to do anything — ask it to think the whole thing through with you first.
Most people start by asking AI to do tasks. Write this. Summarise that. The results are mixed, because the task was underspecified. The better approach is to start with a plan. Tell the AI what you are trying to achieve, what you know so far, and ask it to map out every step between where you are and where you want to be. Then work through that plan together, step by step, with the AI doing the heavy lifting at each stage.
This changes how the whole project goes. Instead of improvising your way through a complex build and hitting walls you did not anticipate, you have a clear sequence. You know what comes first. You know what the blockers are likely to be. You know what a finished version looks like before you start.
This matters especially if you are not technical. Technical people have mental models of how builds work — they can roughly anticipate the shape of a project before they start. If you have not built agents before, you do not have that mental model yet. The planning prompt below gives you one, immediately, for this specific project.
Use this prompt. Copy it, paste it into Claude or any capable AI, fill in the brackets, and read the plan it gives you before doing anything else.
The planning prompt
Copy and paste this into Claude, ChatGPT, or any capable AI. Fill in the bracketed sections with your own details before sending.
I want to build an AI-powered agent to help manage the preparation and delivery of medical advisory boards. I work in health communications and I am not a developer — I am comfortable with technology but I have not built an agent before.
Here is what the agent needs to do: help identify and select appropriate advisors; check for potential conflicts of interest before invitations go out; pull relevant recent publications by each confirmed advisor; draft personalised briefing packs using a standard template; track submissions to Medical, Legal, and Regulatory review and manage the comment process; synthesise the meeting transcript into a structured draft report; log transfers of value for compliance purposes; draft personalised thank-you letters after the meeting.
My team size is [YOUR TEAM SIZE]. We currently manage this process [MANUALLY / WITH SOME TEMPLATES / IN A SPREADSHEET — describe your current state]. Our biggest bottleneck is [DESCRIBE YOUR MAIN PAIN POINT].
I want to use [MINDSTUDIO / N8N / I AM NOT SURE YET] as my platform.
Please give me a complete, step-by-step plan to build this. Structure it so that: I know exactly what to do first, second, third — in the right order; each step is broken down into plain-language tasks I can actually complete; you flag anything where I will need technical help or might get stuck; you include what I need to test at each stage before moving to the next; you tell me what a working version of each stage looks like, so I know when I have succeeded. Assume I am starting from scratch today. Do not skip steps because they seem obvious — this is the first time I have done this.
What the plan looks like
Below is what a well-structured AI response to that prompt produces — the actual plan for this build, worked through in full. If you create a plan and the language is unclear, ask for clarity/simplification/whatever it takes. NOTE: You will likely find yourself asking for more details and help on the agent platform. Cowork and any AI tool often gets the menus wrong. You can take screengrabs of what you asee and choices you are being asked to make and you can get direction.
Week 1: foundations
Day 1 — Audit your current process. Before touching any tool, write down every step your team currently takes to prepare an advisory board, from first brief to post-meeting filing. Include who does each step, how long it takes, and where things most often stall or go wrong. This document becomes your specification. You cannot build an agent for a process you have not clearly described.
Day 2 — Set up your advisor tracker. Create a Google Sheet (or Airtable) with the columns described in Part Three of this guide. Populate it with five to ten real advisors you work with regularly. This is the test data you will use throughout the build. Do not skip this step — every agent stage reads from or writes to this tracker, and if it does not exist, nothing else can be tested.
Day 3 — Create a MindStudio account and complete the onboarding. Connect your Google Sheet. Upload one example briefing pack template and one example pre-read document as reference files. Confirm these connections are working before proceeding.
Day 4 — Build and test Step 1 only (KOL landscape mapping). Use the prompt from Part Four. Run it with a real therapeutic area. Read the output critically: is it useful? Does it give you a starting frame you would actually use? If not, adjust the prompt and run it again. Do not move to Step 2 until Step 1 produces output you would use.
Day 5 — Build and test Step 2 (COI pre-check). Connect the agent to your advisor tracker. Test with one advisor whose declaration of interests you already know. Verify that the agent flags what it should flag. Set up the human checkpoint so the workflow pauses here and sends a notification for review.
Week 2: the core workflow
Day 6 — Set up PubMed API access (free, takes approximately thirty minutes following the NCBI instructions). Build and test Step 3 (publication pull) with two or three advisors whose publication records you know. Verify that the agent is finding the right papers.
Day 7 — Build Step 4 (briefing packs). This step depends on Steps 2 and 3 working correctly, so only start here once those are solid. Test with one complete advisor profile through to finished briefing pack. Read the output as if you were going to send it. Adjust the prompt until the output needs only light editing, not rewriting.
Day 8 — Build and test Steps 5 and 6 (MLR tracking and comment management) as a separate workflow. Test Step 5 with a real pre-read claim list. Test Step 6 with a real set of MLR comments from a previous project.
Day 9 — Run the entire pre-board workflow end-to-end with a real upcoming advisory board as a dry run. Do not use this output for the actual board. Compare the agent output to what your team would have produced manually. Note every difference. Adjust prompts as needed.
Day 10 — Brief everyone who will use the workflow. Show them where the human checkpoints are and what they are expected to do at each one. The agent fails if the human steps are skipped.
Week 3: the post-board workflow
Days 11–12 — Build and test Steps 7, 8, and 9 (transcript analysis, TOV logging, thank-you letters). Step 7 requires real rapporteur notes to test properly — use notes from a completed board. Steps 8 and 9 are more straightforward; test with real data from a recently completed engagement.
Day 13 — Run the complete post-board workflow with data from a recently completed board. Compare the agent output to the documents your team produced at the time. This is your quality benchmark.
Day 14 — Review the whole system. What is working well? What is producing output you do not trust? What human checkpoints are being used correctly, and which are being skipped? Most fixes at this stage are prompt-level — small changes to the instructions that produce materially better output.
Ongoing: After your first live use on a real board, you will have concrete feedback on what to improve. Treat the prompts as living documents. The most important thing to track is not whether the agent is fast, but whether the human reviewers trust its output. If they are reading carefully and catching occasional errors, the system is working correctly. If they are rubber-stamping without reading, that is the problem to fix.
Why this approach works
The plan above was produced by asking an AI to think through the problem systematically, then refining it against the real requirements of the build.
This is the principle that matters: for any project more complex than a single task, start by asking your AI to plan it. Not to do it — to plan it. Give the AI the full context of what you are trying to achieve, what you already know, and what your constraints are. Ask it to produce a step-by-step sequence with dependencies, blockers, and success criteria at each stage. Read the plan before you act.
Then work through the plan with the AI as your partner. At each stage, paste in the relevant context, ask the AI to complete that specific step, review what it produces, and move on. You are not delegating the project — you are directing it. The AI handles the execution of each step; you maintain the judgement about whether each output is good enough to proceed.
This is slower than just diving in. It is also significantly faster than building something wrong and having to unpick it. The planning conversation typically takes thirty to sixty minutes. The time it saves — in avoided dead ends, in decisions made clearly rather than by accident, in builds that actually work the first time you use them — is measured in days.
The people who get the most out of AI are not the ones who give it the most tasks. They are the ones who think most carefully about what they are trying to achieve before they start.
The workflow is mapped. The spec is written. Here is how to actually build it — platform, configuration, and every prompt.
This guide assumes you have read the annotated workflow and understand which stages the agent handles. This guide picks up where that one ends: you know what the agent needs to do; now here is how to make it do it.
The build has three parts: choosing a platform, wiring up the tools, and writing the prompts that tell the agent what to do at each step. The prompts are the hardest part, and they are the part most guides skip. This one does not.
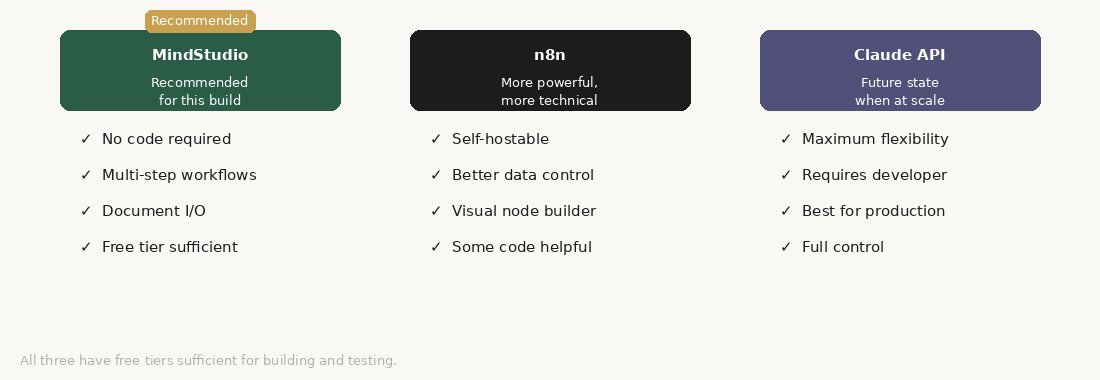
Part one: platform
MindStudio is the recommendation for this build. It is purpose-built for agents that run multi-step workflows, it handles document input and output well, and it does not require you to write code. The free tier will get you through the build; you will hit limits when you run it in production and will need a paid plan.
n8n is more flexible and more powerful, but it requires more technical comfort. If you have someone on the team who can configure it, n8n gives you better control over data handling and better integration with external systems.
Claude directly via the API is the right eventual destination if you are running this at scale or want to integrate it into existing systems. It requires a developer. Come back to this option once you have validated the workflow with a simpler tool.
Part two: tools the agent needs
Before you write a single prompt, connect the following: PubMed via its public API (free, no key required for basic access) for literature and publication searching; document handling so the platform can read and write Word files or PDFs; email — the agent should draft emails, not send them; a spreadsheet (Google Sheets or Airtable) for TOV logging and advisor tracking; and a CRM or contact manager for advisor profiles.
Part three: the tracker
Before you write any prompts, create your advisor tracker. This is the document the agent reads from and writes to throughout the process. It needs: advisor name, title and affiliation, therapeutic area, PubMed author ID or ORCID, declared interests, COI status, invitation status, contract status, TOV category, honorarium amount, honorarium paid date, expenses claimed, and expenses paid date.
This tracker is the agent’s source of truth. Every automated step reads from it or writes to it. Keep it clean.
Part four: the prompts
What follows is the complete set of prompts for each agent step. Each prompt is written to be pasted directly into Claude or into your platform’s prompt field for that step. Variables in [brackets] are filled by the platform from previous steps or from your tracker.
Step 1: KOL landscape mapping
Triggered when a new advisory board project is initiated and the therapeutic area is defined. Produces a longlist of potential advisor profiles.
Prompt: “You are supporting the faculty selection process for a medical advisory board. The advisory board topic is: [THERAPEUTIC_AREA]. The specific clinical questions the board will address are: [KEY_QUESTIONS]. Generate a structured longlist of potential advisor profiles. For each profile, include: the type of expertise needed (not a named individual — do not hallucinate names); the specific qualifications, practice setting, and career stage that would make this profile valuable; why this profile addresses the board’s key questions; and any potential conflict of interest categories to check for this profile type. Structure the output as a table. After the table, write a brief paragraph summarising the balance of perspectives the longlist represents and any gaps. Do not suggest named individuals.”
→ HUMAN CHECKPOINT: Review the profile list. Add named advisors. Confirm the shortlist before proceeding.
Step 2: COI pre-check
Run for each advisor on the shortlist. Produces a structured COI assessment.
Prompt: “You are supporting the conflict of interest review for a medical advisory board. Advisor name: [NAME]. Affiliation: [AFFILIATION]. Declared interests: [DECLARED_INTERESTS]. Sponsor company: [SPONSOR]. Board topic: [TOPIC]. Review the declared interests against the sponsor’s products and the board topic. Assess: direct financial relationships, indirect relationships with competitors, research conflicts, and topic conflicts. For each category, state: Conflict identified / No conflict identified / Insufficient information. Close with an overall COI status: Clean / Flagged / Insufficient information. Do not make a final determination on whether the advisor can participate. That decision belongs to the compliance team.”
→ HUMAN CHECKPOINT: Compliance team reviews all Flagged advisors before invitations go out.
Step 3: Publication pull
Triggered when an advisor is confirmed and their PubMed ID is in the tracker.
Prompt: “You have been provided with a list of publications by [ADVISOR_NAME], retrieved from PubMed. [PUBMED_OUTPUT]. The advisory board topic is: [THERAPEUTIC_AREA]. From this list, identify the publications most relevant to the board’s topic and questions. Select up to 8 publications. For each: full citation, one-sentence summary of the main finding, relevance to the board topic. After the selected publications, write a 3–4 sentence paragraph summarising this advisor’s published perspective on [THERAPEUTIC_AREA]. Flag any publications that suggest a strongly held position on a question the board will be debating.”
Step 4: Briefing pack generation
Triggered when advisor is confirmed, COI is clear, and publications are pulled.
Prompt: “You are drafting a pre-board briefing pack for [ADVISOR_NAME_TITLE]. Board date: [DATE]. Board objectives: [OBJECTIVES]. Key questions: [KEY_QUESTIONS]. This advisor’s specific role: [ADVISOR_ROLE]. Draft a briefing pack with: welcome and context (2–3 sentences); board objectives (bullet list); your role (1 paragraph, second person, specific); key questions for the day (numbered list); preparation (1 paragraph — what they should think about, not a reading list); and practical information [LOGISTICS PLACEHOLDER]. Write in plain, professional language. The advisor is a senior clinician — do not over-explain the science. Collegial and clear.”
→ HUMAN CHECKPOINT: Project lead reviews each briefing pack for accuracy and tone before distribution.
Step 5: Claims tagging for MLR
Prompt: “You are supporting preparation of pre-read materials for MLR submission. The pre-read document contains the following claims that require references: [CLAIMS LIST]. For each claim: identify what type of evidence is needed; suggest the most appropriate source type and specific publication where you can; flag any claim where the evidence base is uncertain. Format as a table: Claim number | Claim text | Evidence type needed | Suggested source | Confidence in claim | Notes. After the table, list any claims where you have identified a potential mismatch between the claim and the evidence.”
Step 6: Post-board transcript analysis
Prompt: “You are supporting the drafting of the meeting report for a medical advisory board. The board addressed the following key questions: [KEY_QUESTIONS]. The rapporteur notes are: [RAPPORTEUR_NOTES]. For each key question: summarise the range of advisor positions (2–4 sentences); identify the areas of agreement; identify the areas of productive disagreement; pull out any specific advisor formulations that should be preserved verbatim (flag these VERBATIM); summarise any specific recommendations. After the per-question synthesis, write an executive summary of 200–300 words. Important: do not smooth over disagreements. Flag anything that is unclear in the rapporteur notes.”
Step 7: Thank-you communications
Prompt: “Draft a thank-you letter to [ADVISOR_NAME_TITLE] following their participation in a medical advisory board on [DATE] on the topic of [TOPIC]. This advisor’s specific contribution: [CONTRIBUTION]. The sponsor’s next steps: [NEXT_STEPS]. Draft a letter of approximately 150–200 words. Thank the advisor specifically for their contribution — not generically. Reference one or two things they said that were particularly useful. Confirm what happens next with the outputs. Indicate when the advisor will hear from the team again. Tone: warm, direct, professional. Not a marketing communication.”
Part five: the build order
Build in this sequence: Step 1 first, test it with a real therapeutic area. Add Step 2, test with a real advisor profile. Add Step 3, which requires the PubMed API connection to be working. Add Step 4 once you’ve validated the first three. Build Steps 5 and 6 as separate workflows triggered by document events, not by the advisor onboarding sequence. Build Steps 7 and 8 as the post-board workflow.
The whole build, with testing, should take a competent non-developer two to three days. If it is taking longer, the most likely cause is the tool connections — API keys, sheet permissions, email integration. Resolve the connections first before debugging the prompts.
The test of a well-built agent is not whether it produces perfect output. It is whether the output it produces makes the human reviewer’s job faster and better. That is the standard to hold it to.
— Ned